
FS Bullets & Brass Blogs
Fun at the Range
 Buying a new rifle and taking it out to the range for the first time is, in my opinion, a very enjoyable and therapeutic experience. However, there is some debate as to whether a complex and lengthy barrel break-in procedure is necessary or if all you need to do is take the thing out and shoot it normally while enjoying the new gun experience. After a significant amount of research and web surfing I came to the conclusion that a special break-in procedure is not necessary. All that is really needed is good gun maintenance and care. I am sure some shooters will disagree. And it seems every gun and barrel maker has their own suggestions as well. However, the manufacturer of my new rifle, Thompson/Center, says on their website that you only need to avoid overheating the barrel and clean it frequently—so that is what I went with.
On the appointed day, I grabbed my new Thompson/Center Venture 22-250 Remington with a 22 inch barrel and a 1/10 inch twist and headed to the local shooting range. My plan was to fire several rounds each of three different factory loads while measuring the velocity of each shot with my handy-dandy chronograph to get a base line for comparison for future hand loads and also to acquire some empty brass for said hand loading. Since this was a brand new out-of-the-box rifle and I planned on shooting a lot of rounds I also took a full compliment of Tipton Cleaning tools and supplies to help get me through the day. Among the tools in the range box were Tipton's Rapid Bore Guide Kit, Gun Butler, 26-piece Ultra Jag & Best Bore Brush Set, Truly Remarkable Bore Solvent, and a Tipton Deluxe Carbon Fiber cleaning rod. I also brought along Caldwell's Ultimate Target Stand and Caldwell Orange Peel 8” sight-in Targets (I just love those Caldwell Orange Peel flake-off targets).
In addition to the really cool Thompson Center rifle pictured above, I used the tools and supplies listed and shown below.
Tipton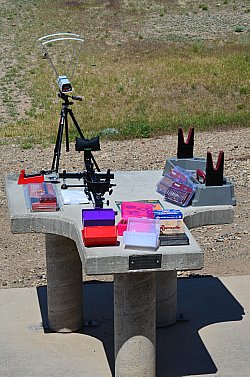
- Rapid Bore Guide Kit
- Gun Butler
- 26-piece Ultra Jag & Best Bore Brush Set
- Truly Remarkable Bore Solvent
- 26" Deluxe Carbon Fiber cleaning rod
- .22-.26 Caliber Gun Cleaning Patches
Caldwell
- The Ultimate Target Stand
- 8 " Orange Peel sight-in Targets
Fs Reloading
- Red Medium Rifle Plastic Ammo Box
- Purple Medium Rifle Rifle Plastic Ammo Box
- Transparent Blue Medium Rifle Rifle Plastic Ammo Box
- Pink Medium Rifle Rifle Plastic Ammo Box
- Black Medium Rifle Rifle Plastic Ammo Box
- Transparent Pink Medium Rifle Rifle Plastic Ammo Box
(The different colored ammo boxes are to help organize empty cases after firing. It turns out I didn't need that many but the boxes are really cheap so no reason to skimp.)
Barnes
- CR-10 Bore Cleaner 8 oz.
Remington
- Shooting Rest ( Not the best shooting rest but better than nothing. I'm still asking Santa for that Caldwell Lead Sled every Christmas but no luck yet.)
 Factory Test Ammo .22-250 Remington Caliber
- PPu 55 Gr.
- Hornady V-Max 50 Gr.
- Nosler Custom 35 Gr.
ProChrono
- Digital Chronograph
Bogen
- Photo Tripod to support the chronograph (A little overkill but I found it sitting in the closet so I used it.)
Lee Precision
- Powder Scale (Why a powder scale you ask? Well—I didn't actually use it for this rifle test but it was in the range box for some unknown reason and my assistant put it out on the shooting table while photographing all the goodies.
 I do not yet own a bore sighter (It's on my Christmas wish list along with that Lead Sled shooting rest mentioned above) so I started out the day with the target set at only fifty yards so it would be easier to sight in the scope without wasting a lot of ammo. I also decided to start out with a cardboard box supporting the targets instead of using Caldwell's Ultimate Target Stand just in case the rifle was shooting low. I didn't want to hit the Ultimate target stand and put it out of action with the first shot. The problem with using a cardboard box target stand in the place where I live is the wind seems to be blowing more days then not. This was one of those "more days than not" windy days so it took more time than I wished to get the targets taped down and enough rocks in the box so it wouldn't move. (I think next time I'll skip the cardboard box of rocks and use the Caldwell Target Stand right off. I'll just ask the boss for another target stand if I put too many holes in it while sighting in my next new gun.)
After firing only a few rounds of 55 Gr. Ppu ammo the scope was reasonably close and so I decided it was time to move the target on out to the 100 yard test distance. By this time I was feeling more confident and decided to set up and use the Caldwell Target Stand along with Caldwell's 8” Orange Peel Sight-in Targets. Unpacking and assembly of the stand was pretty easy and straight forward. The only snag was having to trim off where they hang the package in the stores. Luckily I just happened to have a knife with me. The Orange peel targets were really easy and quite nice to use because they are just a big self-adhesive sticker needing no extra tape, pins, nails, glue, chewing gum or anything else to hold them down.


 I was a little skeptical at first about the Caldwell Target Stand's ability to stay upright in the 15-20mph wind which was blowing that day. I had a feeling that the backer board would act just like a kite and blow away. As I walked down the range that is pretty much what happened. I had to hold it at an angle to prevent it getting blown out of my hands. After reaching the desired 100 yard target distance I had more doubts because the ground was really hard and rocky. It took a little effort and some force but the foot hole and a back and forth motion made driving the stakes into the ground possible. To my surprise, it never felt like I was over stressing the plastic. I was extremely impressed with how stable the stand was even in the high wind plaguing us that day. The wind was blowing almost straight on but the stand never tipped over or broke. The backer did sway back and forth a bit in the wind and probably did affect where the bullet impacted on the paper but not bad enough to cause any problems. Over all I was impressed with the Ultimate Target Stand. I especially like the ease and speed of set up compared to my old cardboard box and rocks method.
After completing the sight-in operation and letting the barrel cool down a little bit I decided to clean the barrel before collecting data. I also decided to follow the same cleaning procedure after each brand of factory ammo to eliminate copper fouling as a factor in the results. The Tipton cleaning tools and supplies made each cleaning job go by fast and easy.
I started cleaning by setting the gun up in the Tipton Gun Butler which kept the gun and everything else in place inspite of the wind. The thing I like most about the Gun Butler is its easy portability and the way it holds the gun really steady even when pushing pretty hard on the cleaning rod to get the brushes through the barrel.
Since it was a slow day at the range, I was able to set up the Gun Butler on a separate table next to the shooting table. This made switching between shooting and clearing a snap, saving time and headaches all around.
 This was my first time using Tipton's Rapid Bore Guide kit (or any bore guide, for that matter). I've always just cleaned my guns with a slotted jag and dipped the patch into the bore solvent container and then into the barrel while trying not to make a mess. So I was excited to see what difference a bore guide could make. I was really quite pleased at how well it worked and how clean everything stayed. The pipettes that come in the kit are a great idea. They make getting just the right amount of solvent really easy and eliminate the usual runoff I get with an over soaked patch. The Rapid part of the Tipton Borguide Kit is the patch port and patch plug which is a really nice feature that helps eliminate any mess. The patches stayed lined up and where easily pushed through the barrel. Over all I was really happy with the Rapid bore guide kit and cant wait to use it on my other guns.
Now that the rifle was sighted in, cooled down and cleaned and new targets set up at 100 yards distance, it was time to get down to business and accomplish what we came for. My goal was to test and compare differences in three factory loads. I'm especially interested in comparing the rather expensive Nosler ammo to the really cheap Ppu ammo. Then I plan to take the spent brass from those tests to look for any differences in case construction, ease of reloading and for any differences in the final hand loads. The factory ammo I brought for this test was Ppu 55 Gr., Hornady V-Max 50 Gr., and Nosler Custom 35 Gr.
Chronograph results in feet per second |
|||
|---|---|---|---|
| Ppu 55 Gr. |
Hornady V-max 50 Gr. |
Nosler Custom 35 Gr. |
|
| Velocity 1 | 3325 | 3584 | 4166 |
| Velocity 2 | 3384 | 3633 | 4343 |
| Velocity 3 | 3367 | 3623 | 4166 |
| Average | 3349 | 3620 | 4249 |
| Standard Deviation | 45 | 36 | 73 |
They all preformed just liked you'd expect for factory loads. The overall accuracy for all three was very similar. I attribute slight differences in group size to the different bullet weights and the extreme windy conditions. However, I was surprised to find the cheap Ppu ammo produced significantly more consistent velocities than the rather expensive Nosler ammo. Just goes to show, higher price doesn't always mean better stuff.
Now with these results in hand, the next step is to go back to the bench, reload that empty brass and compare my hand loads to the factory results. I can't wait to see how closely I can match the consistency of the factory loads tested! I'm betting I can do at least as good as Ppu.
Overall it was an extremely fun and informative day at the range. I can't wait to get back out there with some of my own hand loads to put to the test. All the new gear and tools made the day a lot more fun and a lot easier to accomplish what I set out to do.

Until next time, wishing you happy reloading and safe shooting.
Your newbie guide,
Travis Peacock
Leave your comment